
In the distance, at the medium-lofty heights of top 500ish Infinite, the faint echo of a madman rings out.
BLOB BLOB BLOB BLOB
That’s right. With Blob in Spotlights this week, it feels like the perfect time to unveil the secrets to my single-minded success on the ladder this season. I’m coming at you with a deck guide for a list that features the Immovable Blob himself, a pet deck of mine very dear to my heart: good old Sandman Ramp, featuring plenty of my favorite ill-intentioned ne'er-do-wells!
Sandman Ramp
Now you might be thinking to yourself (a bad habit we’ll fix later):
“Whoa, whoa, whoa. This guy’s article history is pretty much entirely talking about variants, and the odd card preview where he gets sidetracked talks about comics too much. I wasn’t even sure he actually played the game. He’s writing a deck guide?”
You might think, “I wasn’t going to think any of that. I definitely wasn’t going to check your article history.”
And you would wound me! But it’s a good point. I am not a Spike, as the MTG kids call it. I’m no stats-driven gamer like some of my Snap.Fan companions, chasing competitive dominance.
But I am someone who enjoys winning my way, and this season, I got the urge to grind. With the advent of the Thunderbolts season, headed by none other than Thunderbolt Ross, I thought I’d take a page from Elaine from Seinfeld and assemble some of the biggest, baddest villains to help me punch my way up the ladder.

The Record
I don’t have a life.
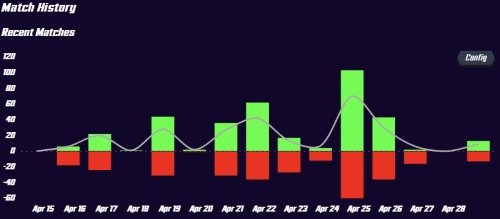
This is almost literally the only deck I’ve played all month; I climbed to Infinite on the back of this deck in about a day and a half and afterward piloted it successfully from a starting point somewhere in the 6000s. Then, balance changes occurred that altered cards fundamental to the deck’s strategy, and I was forced to consider my options and adapt each time.
When Sandman was changed, I decided to change nothing about the deck and climbed to the top 500s.
When Red Hulk was nerfed, I changed nothing further and peaked in the 400s.
After 740ish games and two balance patches, I’ve currently oscillated and peaked at the mid-400s in Infinite, with (at the time of writing) a week and some change left in the season. Make no mistake— this is not necessarily some cutting-edge technology that’s cracking the meta wide open. I don’t necessarily think this cracks any Tier-1 ranking or upends what pro players are considering at the highest levels of play.
It is a ginormous deck with more points than a dodecahedron, and I’ve found it a lot of fun and success this season. I wanted to share my success while it was relevant and maybe help out players who need something solid for their own pushes to Infinite and beyond. So read on, True Believer, if you are interested!
And you can play this at whatever point in the article feels appropriate.
IT’S LITERALLY JUST AC/DC’S THUNDERSTRUCK
The Plan
If it sounds dumb, it is.
We use Electro and Wave to cheat the energy curve, letting us play a 5-Cost card and not one but two 6-Cost cards in the second half of the game. Our top end is %@#!ing huge, and we leverage that to beat our opponent’s plays in pure card-for-card power. We supplement this with disruptive options that force our opponent to play at our level. We ask increasingly large questions that they can’t answer.
Any game we don't draw our Ramp by turn 3 is grounds to retreat.
Any game we do?
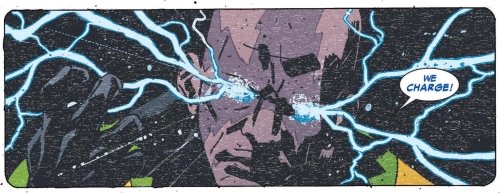
Amazing Spider-Man #612, writer Mark Waid, pencils Paul Azaceta, colors Dave Stewart
The Roster
What are we, some kind of Thunderbolts
The Ramp
The secret to winning is cheating.


As a Ramp deck, this list hinges entirely on drawing and playing Electro and Wave on turn 3. If you play Electro, your ideal following curve is 5-6-6; if Wave, 6-5-6. You rarely diverge from these lines: even 5-5-6 is a pretty inefficient use of the ramp options we’ve built our entire deck around. Our psychotic curve minimizes Electro’s downside: we’re rarely in a position to play more than 1 card a turn in the best situation anyway. (If you’re given a chance to destroy Electro, it’s often not actually worth losing the 2 power.)
Wave’s symmetrical effect can be dangerous, but the extra power can be helpful, and (ideally) your early 6 drop is better than theirs.
Play them on 3 and run hog-wild— ‘nuff said.
The Early Game
Technically, we need something here.


We have exactly two cards to help smooth out the two turns leading up to our ramp: Sunspot and Nebula are the most power you can get out of a 1-Cost, and they’re the best options for evening out an otherwise wildly uneven curve. Sunspot gets value from inefficient or skipped turns, and he synergizes with the extra Energy Electro gives us. Nebula puts location pressure on our opponent and can spiral into a highly efficient threat without further investment. Both are often crucial: points accumulated early will help you take a winning position to leverage the rest of the deck later. If you have to choose between playing Nebula or Sunspot turn 1, play Nebula— getting her first turn out of the way so she can start growing is more time-sensitive than Sunspot.
The Utility
Some of our big guys have to be smaller than our other big guys.

Sandman’s prospects have been looking up after his redesign earlier this month. I was initially concerned— losing the Ongoing effect meant no more turn 4 lockouts! But, as it turns out, 7 is a larger number than 4, and gaining 3 power is more than enough to compensate for our favorite sandy Spidey-squasher. Sandman is an ideal option in the Wave-6-5-6 line: the added power lets him swing a lane by himself, and the following turn, you’ll match their puny play with something much larger. He also still locks out his fair share of Angela-Bounce-type decks or anything that depends on multiple plays on 6; match a Sera with your Sandman and watch them run.

Doctor Octopus: the hubris play, the plan-mangler, the Kick-Me sign. I’ve been a fan of The Good Doctor’s design from inception— I love how aligned the card is with the character's ego and how often he foils himself. But we’re not here to wax flavor-philosophical— Doc Ock is a potent disruption tool for the combo decks that can go bigger than us, and he’s often the Hail Mary play that’ll make a game winnable… or an easy retreat.

Vision rounds us out as a slippery and difficult card to play around: Electro into Vision is your safest play and offers you far more location agency than you normally have under his or Sandman’s effect. He steals wins against closed locations and lets you shift your power from one lane to another better than your opponent likely can under Sandman.
The Big Guys
The rest of them are WAY bigger.

I waited until the OTA to write this precisely because I feared Red Hulk might eat a nerf. Trepidatiously, I queued up with the same list, wondering if his place in this list wasn’t long… then I climbed 100 cubes back into Infinite-400s and felt better. Thaddeus “Thunderbolt” Ross is just an Enormous Red Man— two procs will push him over into lane-winningly large, and he’s free to grow on board if you play him out early. While the nerf (reasonably) lowers his power floor and makes our Blob slightly worse, he’s still everything our deck wants: a 6-drop that drops and wins a lane by himself.
Speaking of.

BLOB BLOB BLOB BLOB
Ahem. Blob is the literal reason this iteration of the deck exists in my game. I titled it as much back when Blob came out, and I made it. And in the face of the umpteenth Thanos nerf, this deck has finally felt like Blob’s best home: a deck with so many naturally large cards he regularly hits 20+ power. You need to be careful which cards are left in your deck because sometimes you’ve only got your tiny boys left— it’s one of those situations where I like to use the Snap.Fan Deck Tracker, as sponsored by the very site you’re reading this on! It’s not even a shameless plug— Blob’s benefit isn’t just being large, but being variable, and being able to play around that yourself is helpful. Final note? If you use Zola Blob, the leftmost resulting Blob will be larger than the rightmost one (depending on what’s left in your deck). Often, Big is Big Enough, but it’s worth considering.

Giganto isn’t necessarily a good card, but he is a big card—the only virtue I need in a deck. His strengths include Left. His weaknesses are Middle and Right. Am I running him 70-80% because I got his terrific Hipp almost a year ago? You bet. But at 14 base power, he also helps pump our boy Blob up far beyond the 15-power cap, and he’s more broadly usable than his comparably-powered compatriots like Agatha, Destroyer, or even Infinaut.

Zola is the secret sauce— We are making a very limited number of plays throughout 6 turns: figuratively speaking, this truck doesn’t corner well. But Zola lets us pull one last trick on 6, often juking Shang-Chi and winning lanes you weren’t supposed to. Is he telegraphed? Absolutely— but compared to everybody else in this deck, he’s downright subtle. You want to play around Zola as much as possible: planning out your early turns, leaving a lane clear for your Zola target, and controlling priority as necessary (especially taking priority on 5 to have Zola beat a Shang-Chi on 6). Red Hulk or Blob are your best Zola targets, though there are times when Giganto, Doc Ock, or even Vision are also acceptable. Note that if you move Vision into your Zola lane, he will be an eligible target, regardless of the order in which moved and played cards in. It comes up!

Magneto is our last heavy-hitter, and it’s telling that we’ve built our deck correctly when he feels positively small compared to the rest of the squad. But he’s still 12 power— and, more importantly, he offers one last precious point of interaction with the enemy’s game plan. Like Ock, Magneto will sometimes steal games by disrupting or clogging your opponent’s lanes— and similar to Zola, you can surprise your opponent on turn 6 by affecting multiple lanes at once.
The Strategy
Okay, I lied earlier. We’ll have to think a little.
You might look at this deck and scoff, saying it plays itself with little to no thought. You’d be right. You might also look at this deck and scoff, saying it folds immediately to Shang-Chi. You’d also be right!
This deck isn’t beating the chimp brain allegations, and it’s not looking great for me, either. But there’s a strategy to be had, and it’s actually more important when you’re basically going to be playing no more than 5 or 6 cards in an entire game.
Plan your lanes ahead.
This deck pivots with all the agility of Howitzer, meaning you’ll have to play accordingly. Your little cards can roughly be considered to add up to a Big Card, which means often you pair Nebula and Sunspot in the same lane and play your ramp into that lane as well. That lane often forms one of the two lanes we want to be winning going into turn 6. Grouping them all together also makes it easier to keep our Zola options open.
As for your large cards, it should be relatively clear that you never want to commit two 6-drops to the same lane— your big cards should be close to winning their lanes by themselves, and you generally want them alone for Zola anyway.
One of our big cards can literally only be played left, so maybe play your early game elsewhere and your other big cards also elsewhere. What this means is I often play Sunspot/Nebula/Electro/Wave mid or right and then try to keep my subsequent cards separate from there.
When the going gets tough? Quit!
Ramp decks are a wonderful way to learn how to Snap and manage cubes because the rules are simple. If you don’t have Electro/Wave on 3, there’s zero reason to play for more than 1 cube.


Similarly, if you’ve lost priority going into 6 and your one big card likely won’t win the game back, leave! You’re not picking tempo back up after getting Shang-Chi’d or Killmonger’d. It’s not happening. Just leave. Feel comfortable with being the Big Stupid Deck—because, for every game, you get hit with a Shang-Chi and then get emoted relentlessly; there’s a game where you sit on them with a 30-power Blob and then get emoted relentlessly.
All you have to do is decide which games are worth 1 cube.
Snap before your opponent can tell you’re going to win.
The opposite is actually harder to learn— this deck wins in such large and bombastic ways that your opponent probably heads for the hills as soon as they see signs of defeat. As such, your snap opportunities come earlier than you might expect— if it looks like your turn 5 Doc Ock or Sandman will hose their game plan, snap! If it looks like your first big 6-Cost will make you favored, Snap before you drop it. And if it’s turn 6 and you think you take the W? Don’t snap, and bet on the double cubes at the end!
Know your matchups and know your outs.
This largely comes from experience— I’ve got a goldfish memory that usually doesn’t pay too much attention to a game after it’s over, so I usually don’t think too much about data, but over time, you get a sense of what this deck does or doesn’t play well into.


Movement cards like Jeff or Vision are bad news— they let your opponent redistribute power easily, and we’re only playing one card a turn here. Destroy decks all make Killmonger inevitable, and losing our entire early game often loses us the entire game. (Knull also pretty much blanks our Zola, which isn’t great). Finally, we can’t go over the top for the likes of Living Tribunal or Hela— their numbers will be bigger, and your only chance to win is to disrupt them with either Doc Ock or Magneto.
Options against these decks are limited, so don’t be afraid to leave. If things look playable, look for ways your Sandman might lock out a Destroy deck or for your other disruption options to steal the win. The emphasis here is on stealing: you aren’t supposed to win these games, so treat them accordingly.
At the same time, know which cards signal an easier time for you. Decks running something like Sera or Kitty often struggle against Sandman; combo decks with Wong and the like often fold to a well-placed Magneto or Doc Ock.
The Good Locations and Also The Bad Ones
These section titles are getting less cinematic.
Locations should factor into your Snapping strategy. In fact, managing and playing around the variance of locations is probably one of the better ways to improve with this deck because its basic lines are so straightforward.
Favored Locations


Locations that limit play are good for us, broadly speaking: Kyln, Sanctum Sanctorum, and the like give us a chance to leverage Vision and Zola. We play well into Space Throne— though rather than using our biggest dudes there, you’ll often want to cover against enemy shenanigans with Vision, if not actively trying to plug their side with Magneto or Doc Ock.


Speaking of, locations like Bar With No Name, Sinister London, and Bar Sinister (a wild villainous coincidence, writing that out) are especially favored for the armed physician— be ready to Snap and watch those arms pluck their hand from them because the random assortment very rarely beats the rest of your gameplan or even just multiple multi-armed maniacs. Special thanks goes out to Arnim Zola in Bar With No Name games— don’t be afraid to play your big card into Bar and then Zola them out.


Locations focused on who’s winning at that location can be pretty obviously great for us (Nexus, most notably, but also Baxter Building and Crown City). Still, you should be mindful of our vulnerability to cards like Shang-Chi— especially if we’ve attained priority.


Finally, safe spaces like Wakanda or Knowhere can give you some peace of mind against those pesky tech cards for your Large Men—though you’ll want to make sure you weren’t planning on Zola’ing them afterward if you play them there.
Unfavored Locations


In most endgames, we’ll have five or six cards on the board, which means that any location that rewards having multiple bodies is bad news. Locations like Nidavellir dampen our ability to win a lane with just One Big Guy, and you’re flat out not going to fill Raft or White Hot Room first. (Even if you get the Raft card, you’re almost never going to be able to play it under Electro.)

Mojoworld is special— it’s bad for us for all the reasons above, but sometimes you can leverage a combination of Magneto or Sandman to steal a guaranteed win there.


Dream Dimension and Lemuria can really ruin your day— more than normal. Lemuria interfering with your turn 3 is grounds for a retreat, while Dream Dimension interacts poorly with the Wave line (less so with Electro).
The Rest


There are too many locations to just classify as good and bad, and you just need to get an idea of how your cards interact with the wide variety of locations in the game. Think critically, and think creatively! It’s not worth destroying Electro for the sake of it, but you might get a lot of tempo playing Electro into Vormir— you might win outright playing Electro into Castle Zemo or Oscorp Tower. You can capitalize on the energy from Djinns from the Noor Dimension, but only if you don’t have Electro active. And (every once in a while) you can play the Immovable Blob into Strange Academy and keep priority going into 6. The more you can squeeze advantages out of seemingly neutral locations, the more success you’ll find.
The Benchwarmers
The B-List, the Second-Stringers, The B-Team, The Other Guys, The Backup Plan, The—
There are options beyond the 12 cards included in this list. I’ve already considered optimization decisions carefully, but you might want to take it further. Do you slot in the Dan Hipp Magneto for the variant synergy? Or do you swap out Hipp Zola because it’s not his best work, and the Combo Break edges it out? What do you substitute for the Ultimate Electro variant?
You can also consider which cards might work better in different places if you’re into that sort of thing.


Doctor Doom, Leader, and Odin provide a big-brained alternate top-end Ramp shell that works quite well with Sandman. Reasonably, this is the most immediate possible improvement that comes to mind, and it is something I’m quite open to being better at. You sacrifice raw power, though, which is important in some board states and crucial to dopamine output— but if the tradeoff feels worth it, give it a shot.

Jeff is a card that makes our curve look more sane and synergizes with Sandman and Electro. He’s probably the only other early-game option I would seriously consider if you need more flexibility.

Corvus Glaive is technically ramp, and it opens up a Hela variant, but that’s a different deck at that point. I also don’t have Corvus, so try it if you want, and let me know what happens!


Orka is a giant dude in a whale costume, which automatically makes him worth considering. Giganto is, sentimentally aside, likely the worst card on the list, and you can consider other similarly sized fellas for his position should you so choose. Orka is (relatively) comparably sized, more flexible, and sometimes larger, so he fills our leftmost friend’s role quite well. You can also consider the far clunkier Infinaut (who Red Hulk replaced in my initial list).

Taskmaster is an option similar to Zola for copying a Red Hulk or Blob— technically, the power output is the same. He fits into the Wave-6-5-6 line well, technically raising your possible output to three turns of 6-Cost power. You lose the Shang-Chi juke, though (which is more relevant than you’d think), and his advantage (being 5-Cost) is less helpful in your Electro line.


Devil Dinosaur, Ronan, and Iron Man are all respectable 5-Costs that offer more power on average than Vision, and you could consider them in a deck where you need to eke more of that out. Spider-Woman, Gamora… Any 5-Cost with Good Stats can be considered over Vision. They don’t spike Blob as easily, though, and right now, the utility of Vision’s move is hard to beat.
The Future
It’s now, old man.
These considerations (and more) may come in or out of relevance as the meta further changes. This entire deck may come in or out of relevance as the meta further changes! Technically, a good amount of its original game plan (ramping Sandman out to bully small-card decks) doesn’t even work the same way anymore. I initially made this deck just because Sandman is one of my favorite Spidey rogues, and the thought of making a villainously large deck powered by members of the Sinister Six sounded like my idea of a good time.
I’ve found success with it now— enough that I feel like it’s replicable in your hands! You can consider all of the above as a starting point, even if more updated, modern deck versions make themselves apparent. The most important part of climbing is cube management, anyway, and, at a bare minimum, I think this deck and its play lines encourage you to learn the basics of good Snapping. Ramp is fun! And playing Increasingly Large Men, equally so. So go forth! Give it a spin, and let me know what works and what doesn’t.
And in case you forgot to play it earlier, there’s still some time left in the season to work it into your Snap playlist.